Ducky One 3 conversion to QMK
What
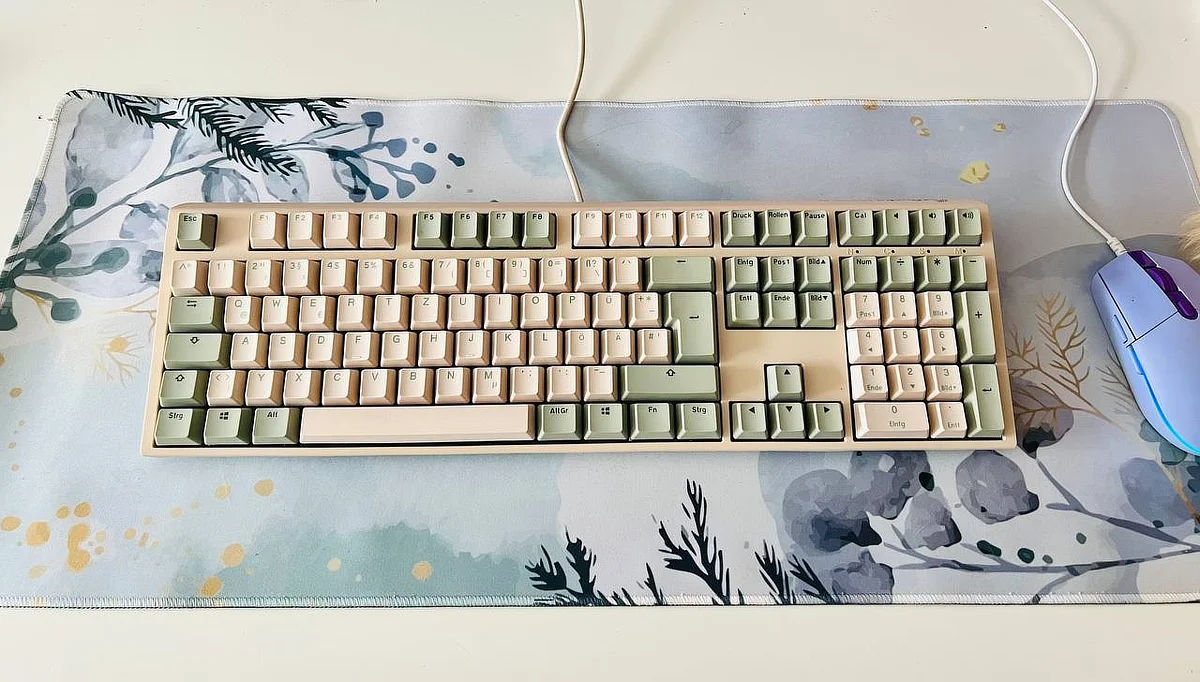
My partner @chaotin@corteximplant.com was gifted a Ducky One 3 Matcha mechanical keyboard. I converted that thing to a Raspberry Pi Pico (RP2040) chip with QMK firmware.
Why
The firmware of the Ducky keyboard did not compensate for bouncing keys correctly and it seems Ducky abandoned updating the firmware for that device. So the keyboard was basically unusable because all the time key-presses repeated multiple times.
Try to write any length of text with an unreliable keyboard.
There are basically 3 approaches to fixing this:
-
Reverse engineer the Ducky firmware and firmware update process. This has been done by
usedbyteson github: Ducky-Tools on Github for another hardware platform from Ducky, but it would not work for the platform on which the One 3 is based on. Furthermore I would have to reverse engineer the original firmware to find the debouncing code and binary patch that. - Write a new keyboard firmware for the Nuvoton chip that is on the board. This would mean to reverse engineer the PCB first and then learn how to write software for that chip and how to get it onto the internal Flash. It seems there is actually a programming header on the PCB, so at least flashing would be not the biggest problem.
- Remove the Nuvoton chip, reverse engineer the PCB enough to find out how to access the keyboard matrix and hot- wire a Raspberry Pi Pico in there. This seemed the most straight forward thing to do, so I started by reverse engineering the PCB.
How
Reverse engineering

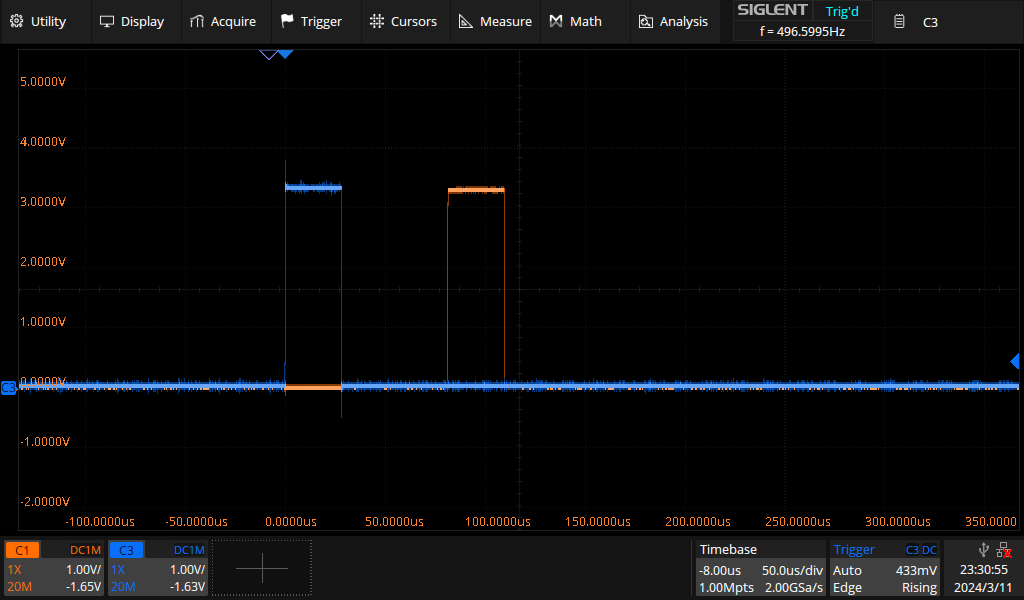
If you have a working keyboard the first thing to try is powering it up and probing around with an oscilloscope to find out where the rows of the keyboard matrix are accessible. You should see a rectangle pulse on each row at around 250 to 1000 Hz. For each row the pulse should be shifted by one pulse length. To find out the row order use two channels of your oscilloscope, trigger on one and look at both channels to see where the pulses are in relation to each other.
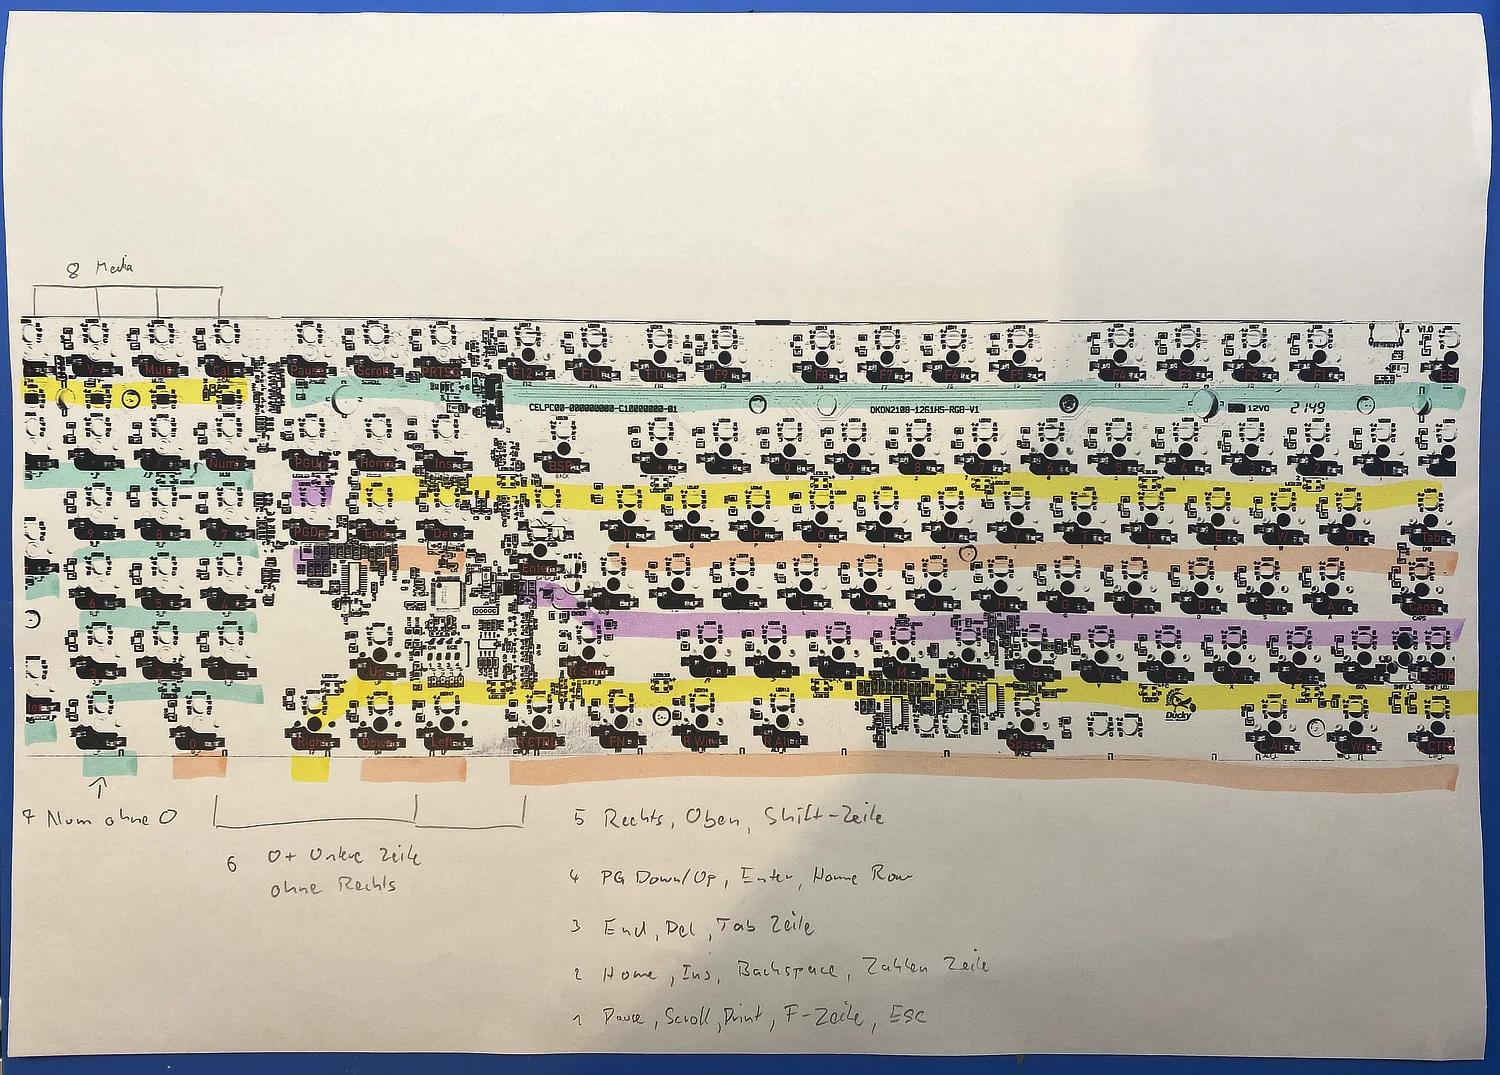
On the One 3 I could find that pulse on each of the switch contacts on the right side and the original firmware scanned with 500 Hz. I found there to be 8 rows with distinct pulses on them, starting with the top row (ESC, F-Keys), then going down the keyboard rows as expected and finished by the Num-pad. The last row were just the four media keys above the Num-pad (Calculator, Mute, Vol down, Vol up).
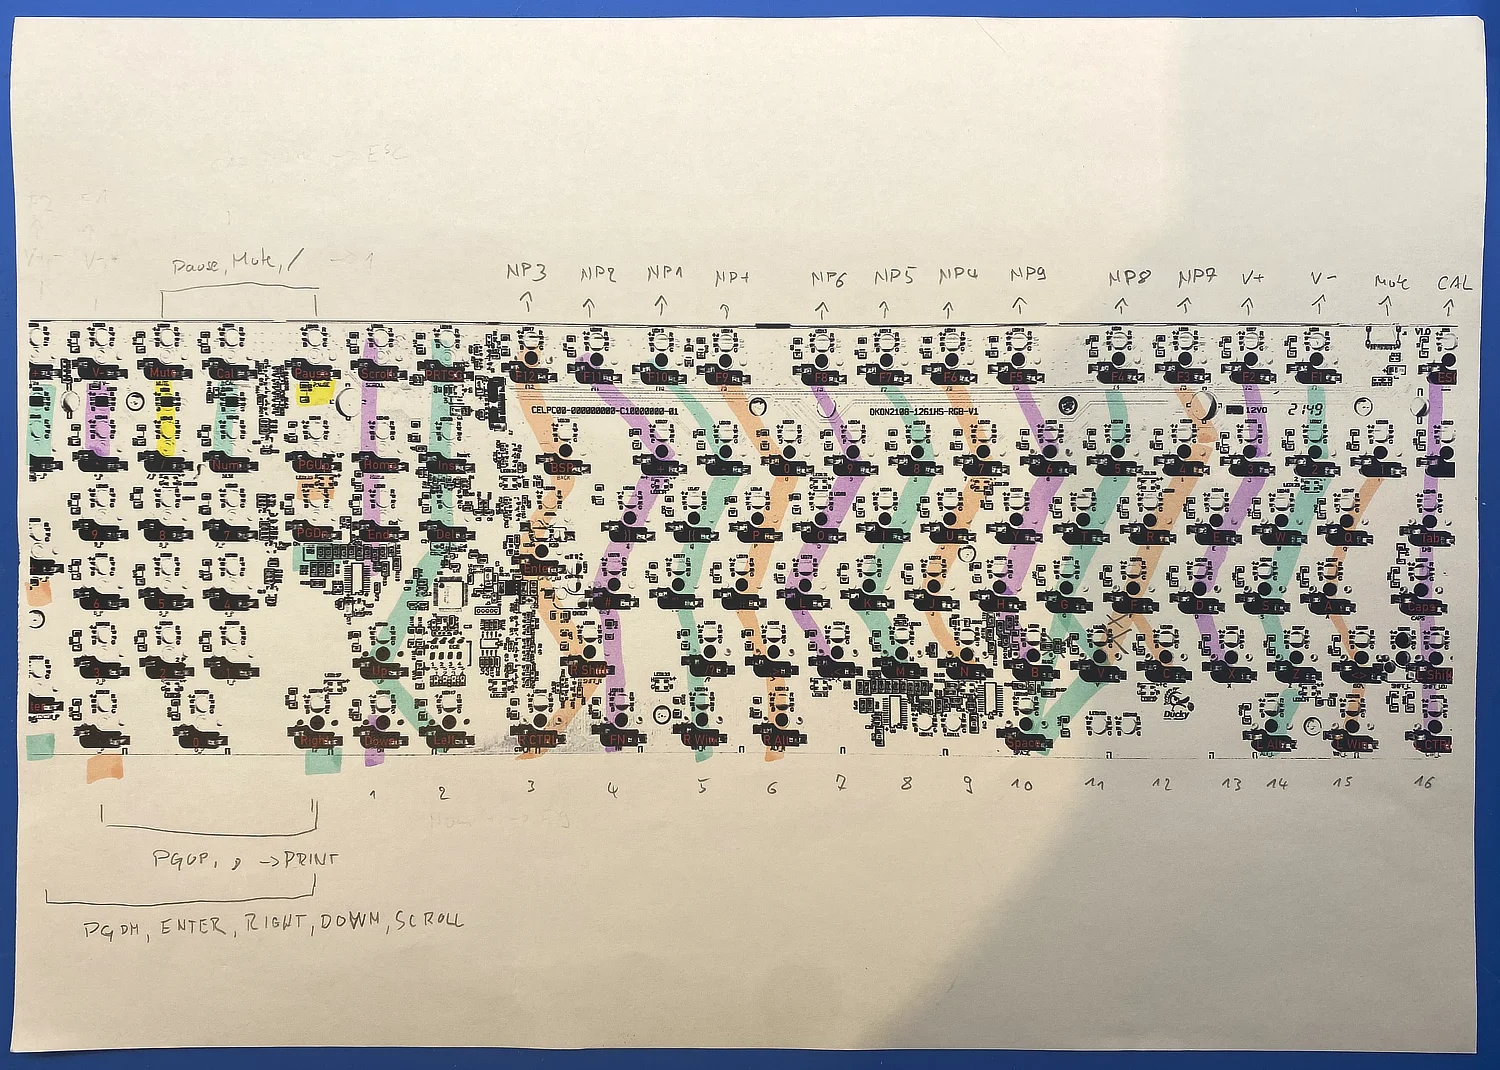
The next step was to find the colums that are connected together, I had to find that by probing with a multimeter in continuity mode. My partner was really annoyed after hearing me search for connections with the beeping mulimeter for about an hour...
Usually the keyboards have one diode per key to avoid triggering "wrong keys" if too many keys are pressed at the same time (N-Key rollover). Gladly the One 3 has them near the key switches and I could measure from diode anode (the pad without the line) to other diode anodes.
Bricking the keyboard for real
After finding out what is what i decided to yolo it and remove the Nuvoton chip with hot air:
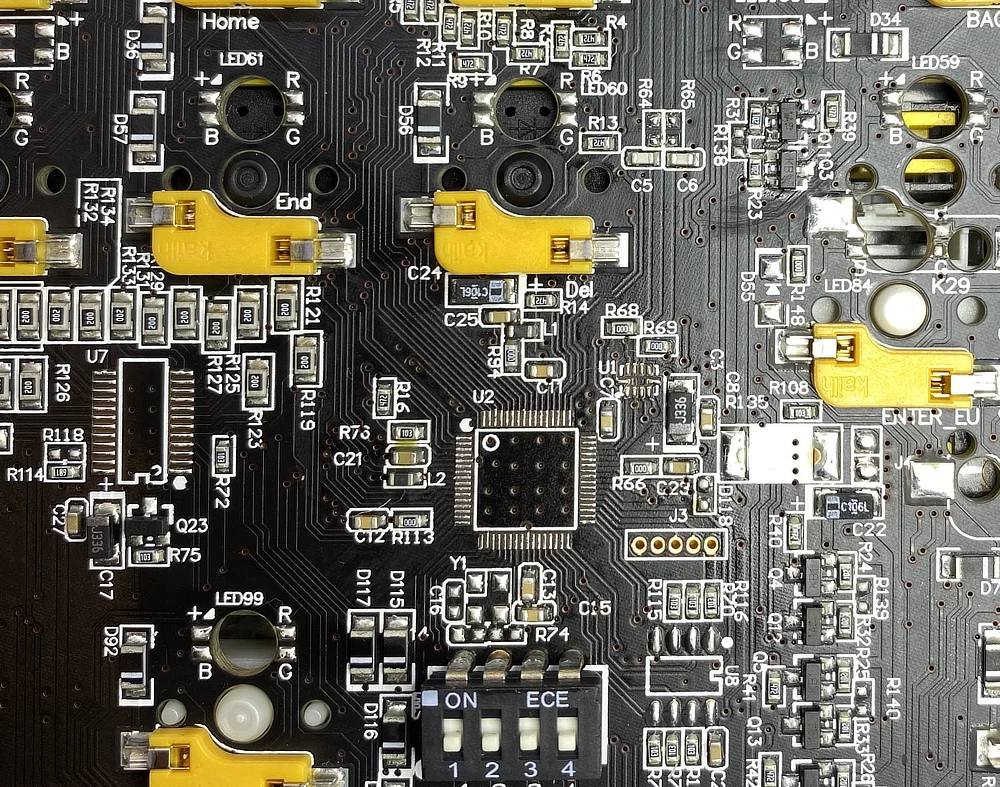
Now the keyboard was dead and I had to come up with a plan to hot-wire a RP2040 into that thing. The first thing I did was to check where to put it. The One 3 has much space in the keyboard case, so this was not a big problem at all.
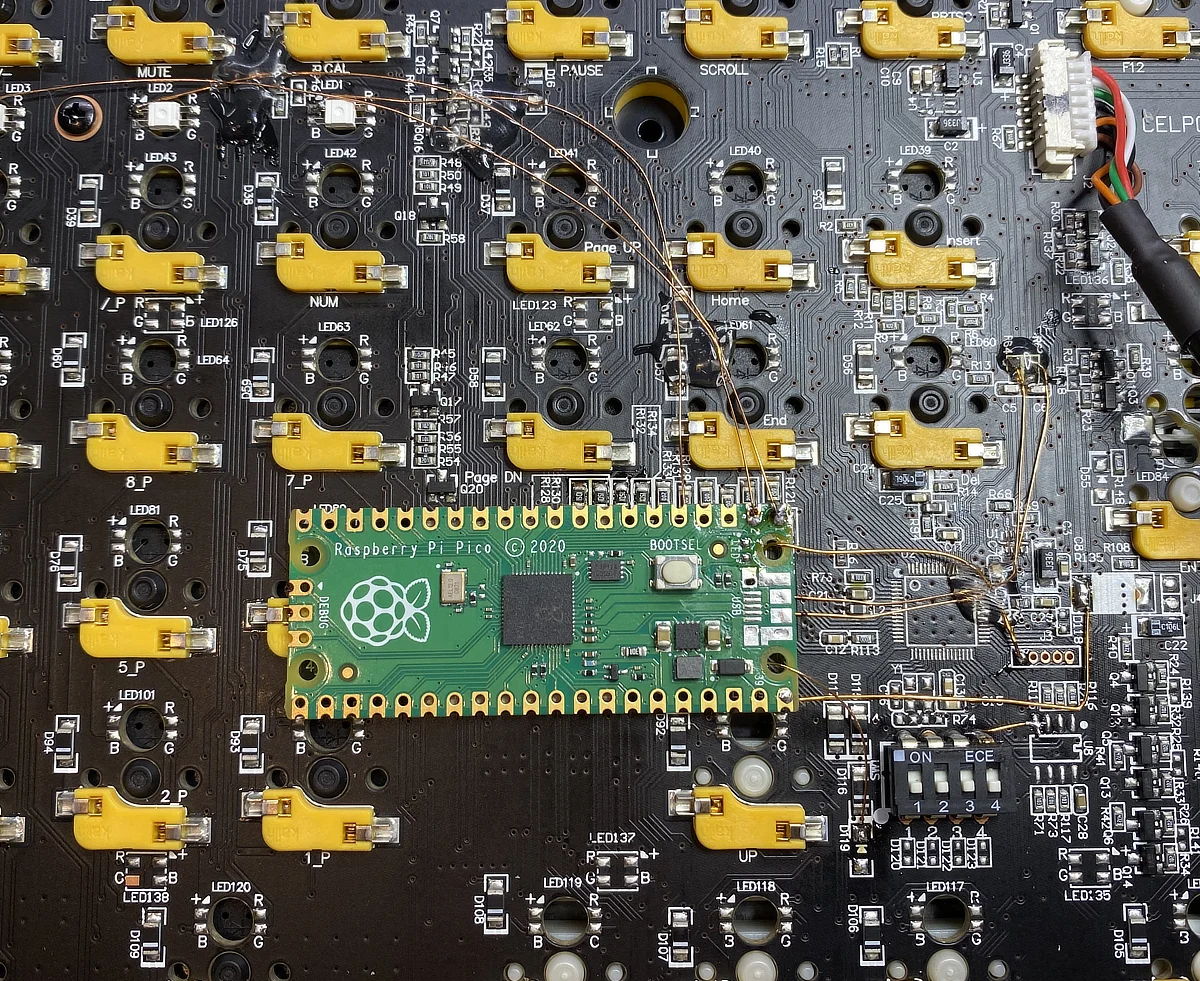
Before mounting the RP2040 permanently with VHB tape I had to remove the Micro USB Port (clearance!) and the LED
from the prototyping module. I needed the pin that has the LED connected (
GPIO25
) for one of the indicator LEDs
of the keyboard. Alternatively I could have skipped the multimedia keys or not indicate Scroll-Lock
(who uses Scroll-Lock?), but the perfectionist in me wanted to have a fully functioning keyboard, so the LED
had to go.
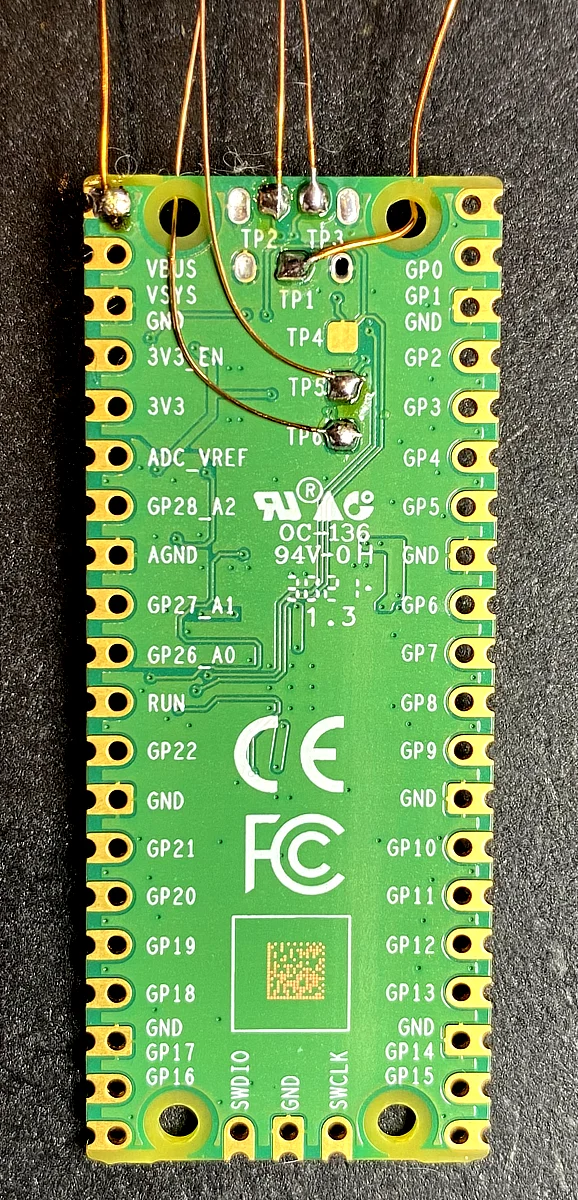
The other test points on the Pico board are connected to GND and USB (thanks for that Raspberry Pi Foundation). This means we can wire the Pico into the original USB port of the keyboard without trying to micro-solder onto the pads of the Micro-USB port (I mean this would not be the smallest connection I've ever made but thanks, no thanks...). As we only running a keyboard in low speed mode I did not bother to make the D+ and D- wires the exact same length or something like that. It will just work fine.
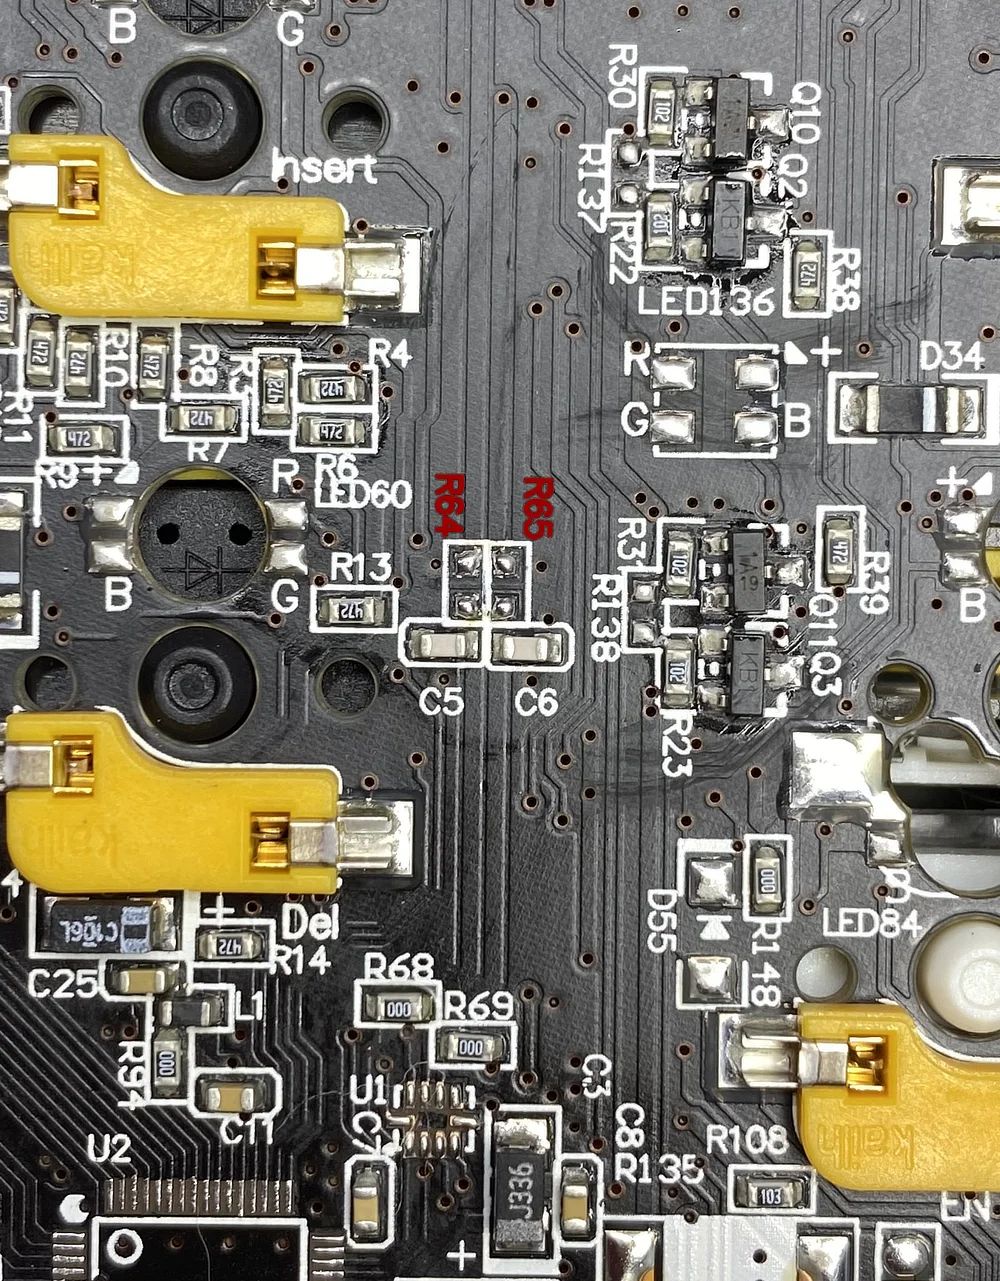
To gain access to the USB-Port of the keyboard I traced where the original chip was connected and found a lot
of stuff in the path (resistors, ferrite beads, etc.). We do not need all that stuff for the Pico, so I removed
the first item in that path which were some 0604 resistors (
R64
is D- and
R65
is D+) and connected the Pico
with enamel wire to those pads. GND did come from the programming header (
J3
pin 1) and USB bus power was
found at a resettable fuse which was not populated on my board (left pad of
R135
).
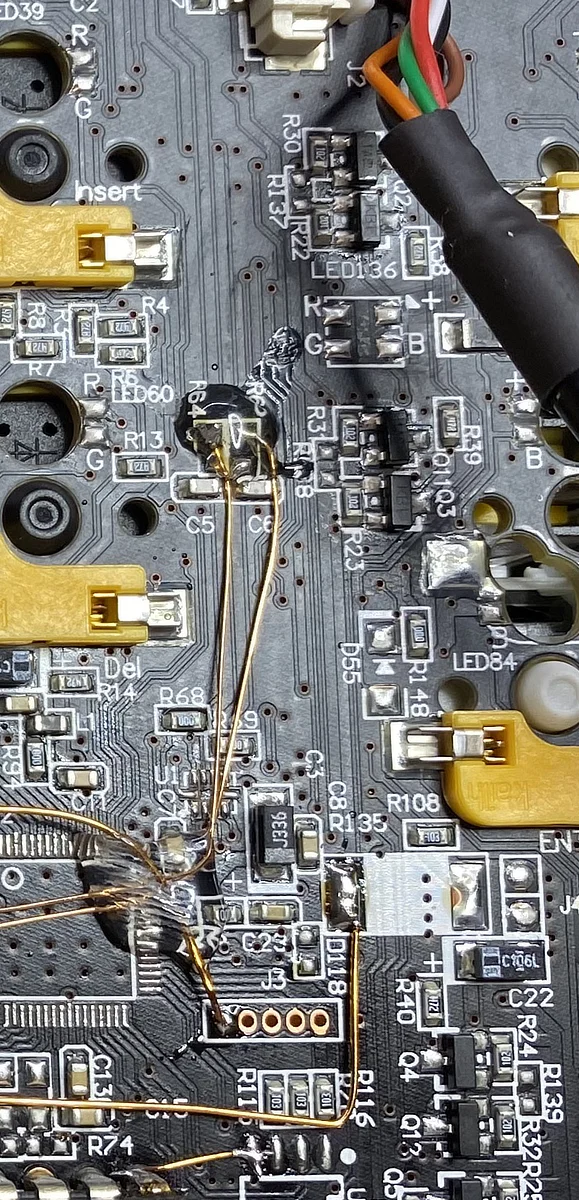
Now I could try to program the Pico via the original USB-Port... it worked first time!
MVP
Next up: do the minimum viable thing, blink the Num-Lock LED.
For this I tried to reverse engineer the cascade of transistors and mosfets on the PCB and I think they multiplex all the LEDs together with the row pulses, because there are some spots on the PCB where you could solder on LED drivers and full RGB backlighting in addition to the indicator LEDs. I could not make heads or tails of it and tried to find a suitable path.
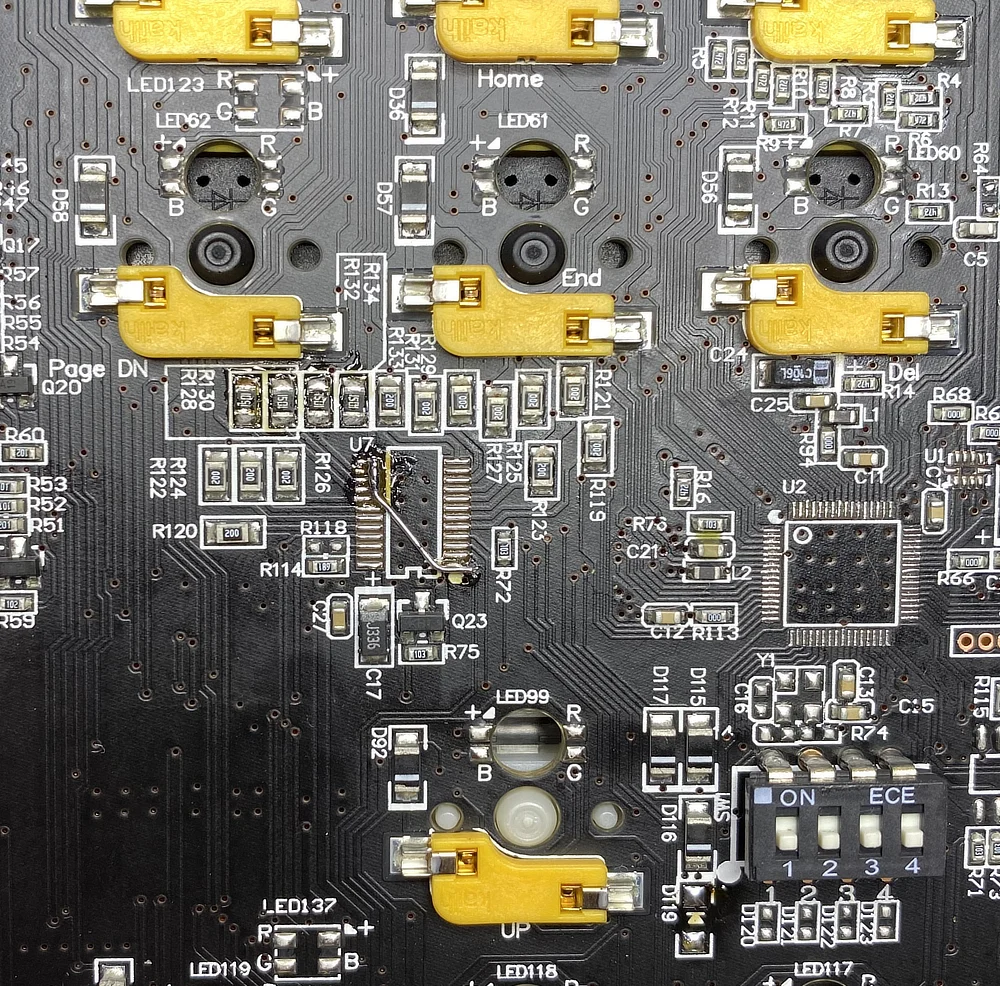
To get GND to the LEDs i shorted some pins of one of the not installed LED drivers and replaced some
0805 resistors to be our current limiters. The original resistors in those spots were about 20 Ohms, so
I think they overdrove the LEDs by a big margin to compensate for the matrix multiplexing. This is usually
not a problem. LEDs release the magic smoke because they get too hot inside, if you can guarantee a 1ms
pulse all 20ms for example you could probably overdrive the LED by a factor of 10 and be on the safe side
still because it has time to dissipate the heat between the pulses. We're not doing that so I had to replace
those resistors (
R128
to
R131
) with something more reasonable. As my partner complained already about the
searing brightness of those LEDs I went with the conservative selection of 1.5 kOhms.
I then connected the
TP5
from the Pico to the positive terminal of the Num-Lock LED and flashed a simple
blink sketch and it worked. Good.
Unbricking in the case of failure
If you somehow brick the firmware on a Pico you can always go back to firmware update mode by holding the
BOOTSEL
key on the protoboard. The board will be inside the keyboard in the forseeable future, but I wanted
to have that option, should anything go wrong in the future, while not having to unscrew the case and push a
button once. The One 3 has a DIP switch on the bottom to switch between Mac and Windows modes and deactivate
the Windows key, etc. This DIP switch is the ideal candidate for that boot mode selection button. Let's modify
it a bit.
At first I removed the diode that probably integrated the DIP switch into the keyboard matrix (why? I don't
know...), thats
D119
for those following along at home...
I probed the path of the DIP switch and found out that the top 4 pins are shorted together, so I shorted that
to GND in addition (
U8
pin 4 is a good location for GND) and connected
TP6
to the top pad of the removed
diode. Now we can switch to firmware update mode by flicking the 4th DIP switch up and re-connecting the
keyboard. Turn the switch off again to boot in keyboard mode.
The copper spider enters the scene
As we have all bottom pads of the Pico connected where they belong we can stick it to the board with VHB tape or a dab of hot glue.
For the matrix connections I just used thin enamel wire again. I have a big roll of that and it makes connecting to small SMD pads relatively easy. Some wire is coated in an enamel that just burns of if you touch it with a soldering iron, this would be ideal as you could add the connections very fast in that way. No such luck with my wire. I mean it burns off the coating if you wait long enough, but at that time the PCB would be damaged for sure. So I removed a bit of the coating by first scraping it with a scalpel and then burning the remainder off with the iron on both ends of the measured wire.
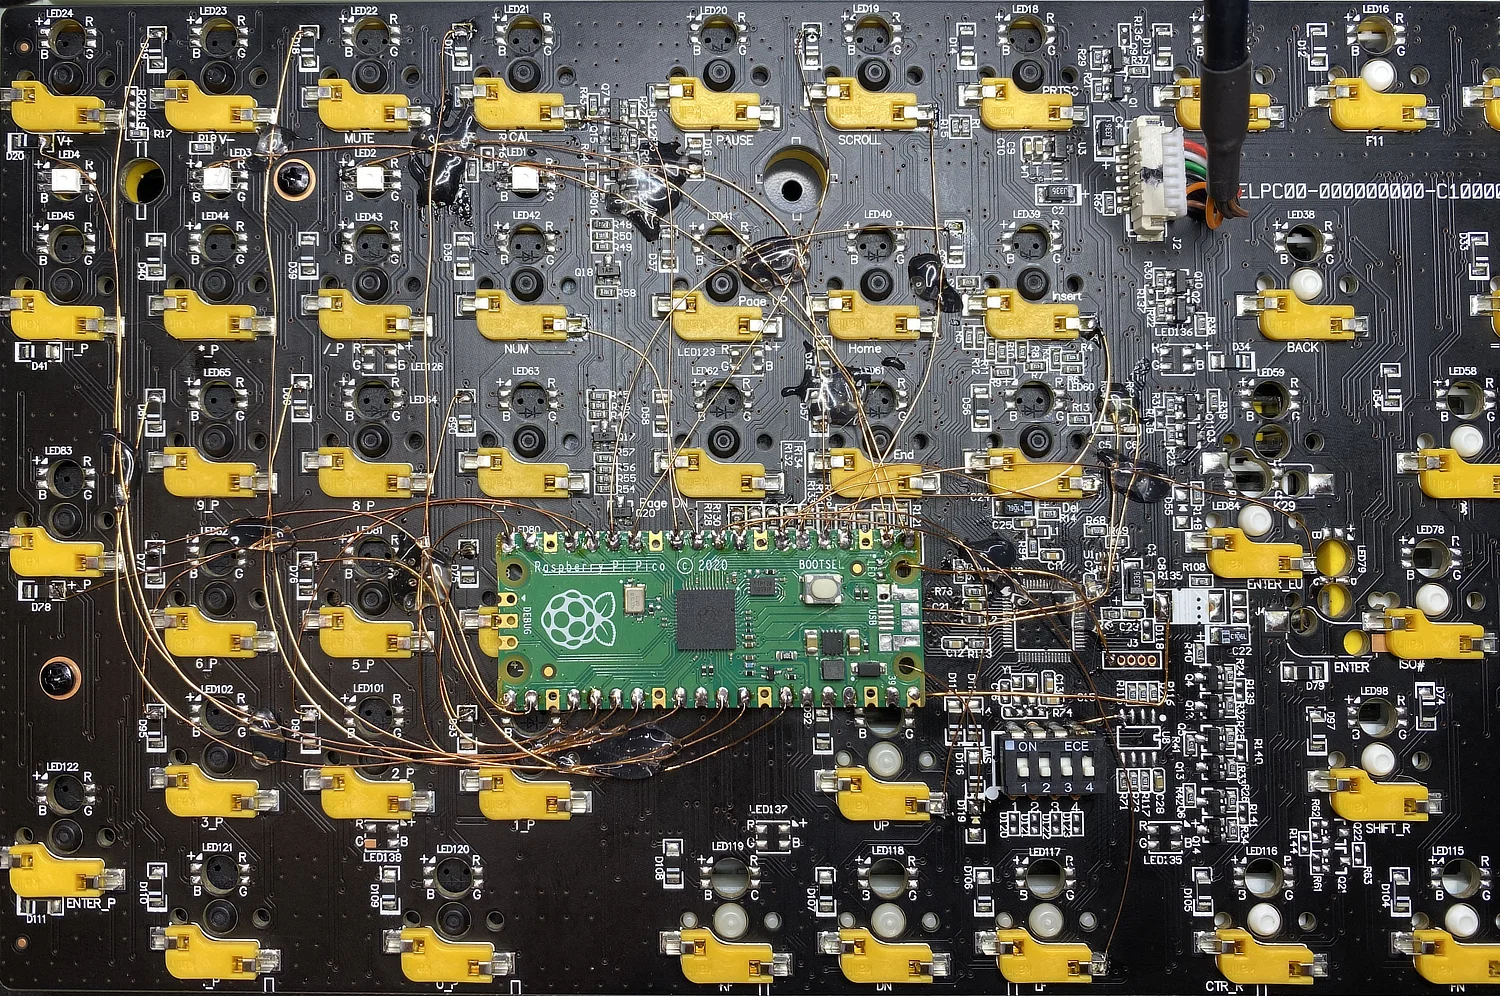
I wired the matrix in this way:
For the rows you have to use the right terminal of any of the listed key switches.
| Row | GPIO | Switch |
|---|---|---|
| 0 | GP2 | Scroll Lock |
| 1 | GP3 | Insert |
| 2 | GP4 | Delete |
| 3 | GP5 | Enter |
| 4 | GP6 | Up |
| 5 | GP7 | Left |
| 6 | GP8 | Num Lock |
| 7 | GP9 | Calculator |
For the columns always go with the top pad of the diode (the one without the line) for the switch in the list.
| Column | GPIO | Switch |
|---|---|---|
| 0 | GP10 | Scroll Lock |
| 1 | GP11 | Insert |
| 2 | GP12 | Numpad 3 |
| 3 | GP13 | Numpad 2 |
| 4 | GP14 | Numpad 1 |
| 5 | GP15 | Numpad Plus |
| 6 | GP16 | Numpad 6 |
| 7 | GP17 | Numpad 5 |
| 8 | GP18 | Numpad 4 |
| 9 | GP19 | Numpad 9 |
| 10 | GP20 | Numpad 8 |
| 11 | GP21 | Numpad 7 |
| 12 | GP22 | Volume Up |
| 13 | GP26 | Volume Down |
| 14 | GP27 | Mute |
| 15 | GP28 | Calculator |
As you can see it is a good thing that the Numpad is connected as one row below the alpha numeric block. We can avoid running enamel wire over the whole keyboard this way and are safely contained below the Num-pad and arrow key areas.
Finishing touches
To finish the electronics side of the build we have to connect the Caps Lock and Scroll Lock LEDs.
I have mapped them to
GPIO0
and
GPIO1
respectively. Just run a wire to the positive terminal of
the leds and we're ready here.
I added some globs of hotmelt glue to secure the fine wires and placed the keyboard in it's lower case at this moment and got to configuring QMK.
QMK
For compiling QMK I would refer to
the tutorial
. If
you want to pull my keyboard configuration you may do so at my
QMK fork at my Github
. If you're
using my fork, make sure to check out the
ducky_one_3
branch.
Compile the firmware with the
qmk
cli by running:
qmk compile --keyboard dunkelstern/ducky_one_3_rp2040 --keymap default
qmk flash
and then connect the keyboard with the DIP switch position 4 turned on and mount the drive that appears.